I used Linoleum Printmaking to create my logo by following these steps:
To create design on linoleum block:
1. Sketch logo on paper.
To create design on linoleum block:
1. Sketch logo on paper.
2. Trace logo design in reverse (I did this by drawing over the sketch of my logo with Sharpie, which bled through to the other side of the paper).
3. Cover original sketch with pencil lead.
4. Place the design lead side down and position where desired on linoleum block (I cut out my sketch and taped it to the block hold it in place).
5. Trace over Sharpie lines with very firm pressure to transfer pencil lead from the paper to the block (before getting too far, check to make sure lead is transferring and apply more lead if needed).
6. Remove paper sketch and darken lines on linoleum block.
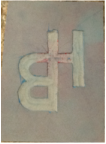
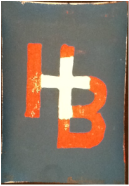
Then it got a little tricky because I had to figure out what to carve first on the linoleum block. I was thinking that I would have to start with printing the background color, then the color of the initials, then the color of the cross. But, I was reminded that the print could only use two colors at most (when I started printing, I realized how difficult it would be to use more). I also determined that carving out the entire background would be a lot of work. Therefore, I chose to carve out the cross first and have that be the color of the paper I was using (white in this case), print a run using the color of the initials (red), carve out the rest of the initials, and print over the run using the color. I had chosen for the background (blue).
3. Cover original sketch with pencil lead.
4. Place the design lead side down and position where desired on linoleum block (I cut out my sketch and taped it to the block hold it in place).
5. Trace over Sharpie lines with very firm pressure to transfer pencil lead from the paper to the block (before getting too far, check to make sure lead is transferring and apply more lead if needed).
6. Remove paper sketch and darken lines on linoleum block.
Then it got a little tricky because I had to figure out what to carve first on the linoleum block. I was thinking that I would have to start with printing the background color, then the color of the initials, then the color of the cross. But, I was reminded that the print could only use two colors at most (when I started printing, I realized how difficult it would be to use more). I also determined that carving out the entire background would be a lot of work. Therefore, I chose to carve out the cross first and have that be the color of the paper I was using (white in this case), print a run using the color of the initials (red), carve out the rest of the initials, and print over the run using the color. I had chosen for the background (blue).
To carve design:
1. Place linoleum block on stop block.
2. Hold knife with blade pointed away from hand that is holding block.
3. Carve out portion of design that will NOT be painted (for me the first time it was the cross and the second time it was the initials). To minimize slips, it helped to wiggle the knife while pressing down when carving the design.
To print design:
1. Scoop out about one teaspoon of block printing ink and scrap onto tray with finger.
2. Use brayer to evenly spread ink on tray until the ink sounds tacky (like pulling apart Velcro).
3. Place the carved linoleum block on a piece of scratch paper and roll the brayer over the block to cover it with ink.
4. Place the block ink side down on final paper and press firmly on back side of block to evenly transfer ink to paper.
Repeat steps 3-4 until desired amount of prints have been printed.
Allow prints to dry before printing second color or cutting out.
If using more than one color of ink, repeat steps for carving and printing design, being very careful to line up design on block with first run of prints.
Sign and number each print with number out of total number of prints (i.e. 1/5, 2/5, 3/5, 4/5, 5/5).
Carefully cut out each print.
Now, trade with friends, give as Christmas gifts, use as wall decor, or however one may wish to show off their personal logo.